Are you concerned about the security and performance of your home or small business network? Network monitoring with a Raspberry Pi offers a cost-effective and powerful solution, allowing you to proactively identify and address potential issues before they escalate.
In today's increasingly interconnected world, the ability to monitor and manage your network traffic is no longer a luxury, but a necessity. From ensuring optimal performance and preventing slowdowns to safeguarding against security threats, the benefits of network monitoring are undeniable. Fortunately, you don't need to invest in expensive, enterprise-grade solutions to gain these advantages. A simple, affordable Raspberry Pi, combined with the right software, can transform into a robust network monitoring system.
Several tools are readily available for this purpose, and all can be installed via the default package manager on the Raspberry Pi. This makes the setup process straightforward, even for those with limited experience in network administration. Options include the versatile Nagios, the traffic analysis tools ntop and darkstat, and the network monitoring software Icinga, all of which can be readily deployed on the Raspberry Pi.
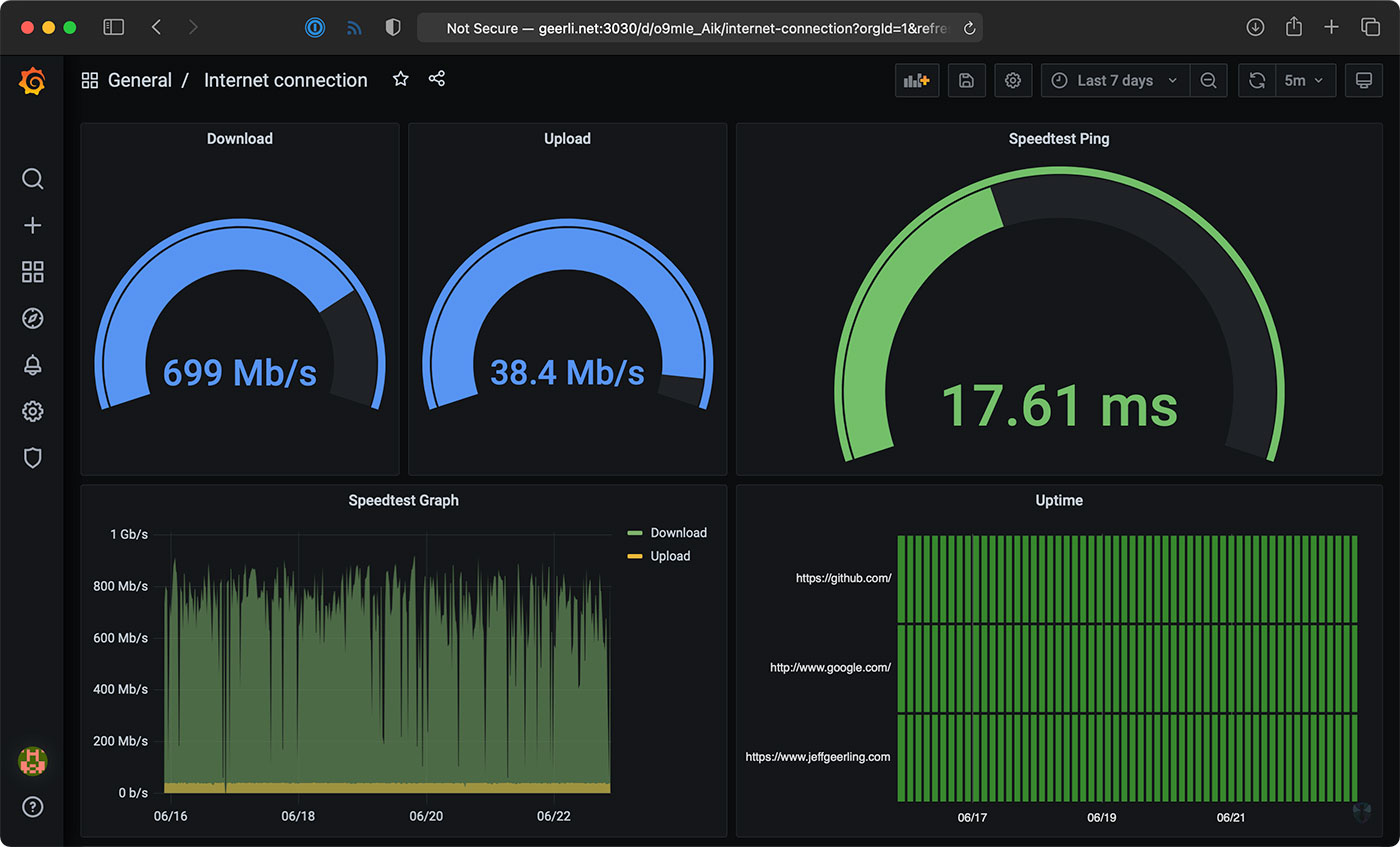
The fundamental concept behind network monitoring is the continuous observation and analysis of network traffic. This involves capturing data packets, examining their content, and identifying patterns, anomalies, and potential problems. By actively monitoring your network, you gain valuable insights into its behavior, enabling you to troubleshoot issues, optimize performance, and protect against malicious activities. Network monitoring is crucial for the raspberry pi network's security and stability. The process allows users to identify potential problems, such as slow performance or security breaches, and take corrective action.
A Raspberry Pi can be monitored remotely using several methods. The Linux Dash dashboard offers a convenient web-based interface for monitoring system resources. Another option is to set up a continuous ping to check the Pi's availability. Alternatively, you can use SSH (Secure Shell) to connect to the Pi and run the `top` command, providing real-time information about resource usage. These tools facilitate remote monitoring over Wi-Fi, Ethernet, or even the internet when used with a public IP address and appropriate port forwarding, enhancing the flexibility and accessibility of your monitoring setup.
When choosing a network monitoring solution for your Raspberry Pi, one of the key considerations is the type of data you want to collect and analyze. Different tools excel in different areas. For instance, some tools focus on bandwidth usage, helping you identify which devices or applications are consuming the most network resources. Others concentrate on security, detecting suspicious activity, and providing alerts about potential threats. Understanding your specific needs will guide you in selecting the most appropriate tools for your environment.
Let's delve into some practical aspects of setting up a Raspberry Pi for network monitoring, exploring the roles of key components and the specific steps involved in configuring your system.
While the Raspberry Pi serves as the hardware foundation for your network monitoring system, the choice of software is crucial for achieving comprehensive functionality. Many tools are available, each offering unique strengths and capabilities. The default package manager on the Raspberry Pi simplifies the installation process, making it easy to experiment with different options and find the one that best suits your requirements.
One of the leading contenders for network monitoring software on the Raspberry Pi is Nagios. Nagios is a powerful and versatile open-source monitoring system, and for a compelling list of reasons, Nagios is a great choice for your network monitoring needs.
Another option to consider is Icinga, which builds upon the principles of Nagios but with its own feature set and a user-friendly interface. For traffic analysis, ntop and darkstat provide valuable insights into network activity, allowing you to visualize bandwidth usage and identify potential bottlenecks.
Before diving into specific tools, a prerequisite is to ensure your Raspberry Pi has a static IP address assigned by your Wi-Fi router. Consult your router's documentation for instructions on how to set up a static IP. This ensures that the Pi maintains a consistent IP address, making it easier to access and manage the monitoring system. It's important to note that while using Wi-Fi offers the convenience of wireless connectivity, it presents one major disadvantage, the wifi traffic (going to the router) will not be monitored.
To begin, the initial step is to install the Raspbian operating system. This is the foundation upon which your network monitoring system will be built. With Raspbian installed, you can proceed with setting up the necessary software components.
Setting up your Raspberry Pi involves a series of steps. You'll need to choose the monitoring software you want to use. Install the chosen software on the Raspberry Pi using the package manager (apt for Debian-based systems like Raspbian). The next step will include the configuration of the software to monitor your desired network resources. This includes specifying the devices, services, and metrics you want to monitor, and setting up alerts for critical events.
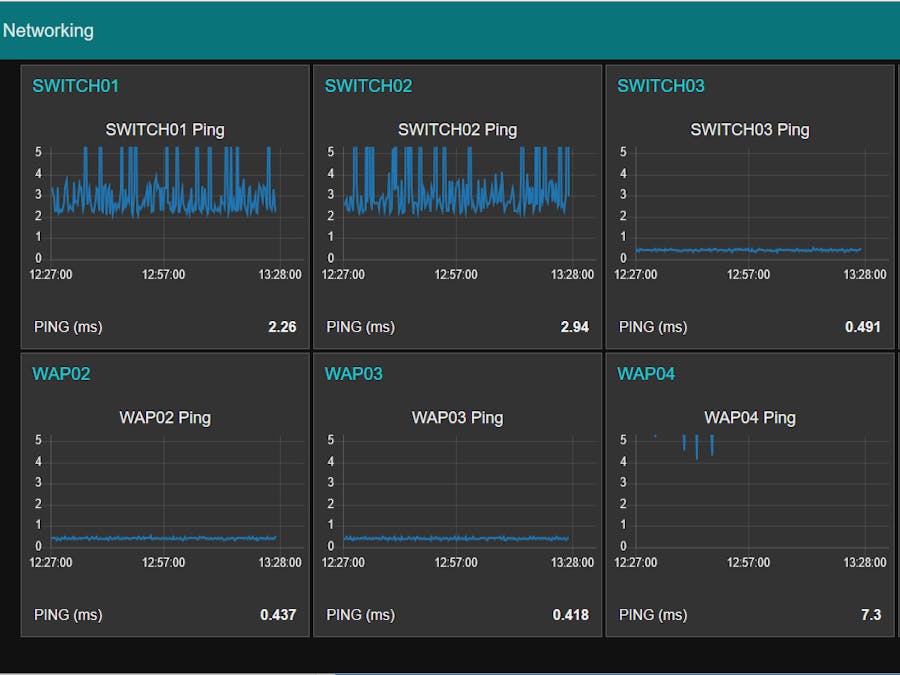
Once you've configured the Raspberry Pi, it's time to start monitoring your network. You'll be able to track a variety of metrics, such as bandwidth usage, CPU load, memory usage, and network latency. The monitoring software will generate alerts based on the thresholds you set. These alerts will notify you of any issues that need attention.
Snmp, or simple network management protocol, is the most popular networking protocol in the market. This is where a network monitor can prove useful. You don't need expensive equipment to monitor your home network. All you need is a raspberry pi and a little time to set it up.
Let's take a closer look at using specific tools, such as ntop and darkstat, which are excellent choices for gaining insights into network traffic.
Ntop is a network traffic probe that shows network usage in real-time. It provides a detailed view of network traffic, including the hosts, protocols, and ports being used. Darkstat, on the other hand, is a simple network traffic analyzer that captures and displays network traffic data. It's a good choice for visualizing bandwidth usage and identifying potential bottlenecks. This guide teaches you how to monitor network traffic on raspberry pi using ntop and darkstat.
To make sure your network is always available, and to know when something is wrong, a network monitor can prove useful. Running a raspberry pi hpc cluster march 18, 2022;How i got my old pi 3 to boot from usb march 16, 2022;How to build the geeekpi raspberry pi cluster case march 10, 2022;How i cracked my own wifi with a raspberry pi february 19, 2022. A simple raspberry pi can become a robot, a beer brewing sensor, and even a home media center. In this article, i will show you how to apply a raspberry pi and the network monitoring software icinga to monitor your networks.
The advantages of using a Raspberry Pi for network monitoring are numerous. First and foremost, it's cost-effective. The Raspberry Pi itself is relatively inexpensive, and the software is often free and open-source. It's also a flexible and customizable solution, which makes it adaptable to different network environments. Furthermore, setting up a Raspberry Pi network monitor does not demand specialized expertise. With the right guidance and a bit of time, even those with limited technical knowledge can create a functional and insightful monitoring system.
One of the major advantages: If you ever want to remove the raspberry pi network monitor, just plug the wifi router directly in to the switch. With proper configuration and a basic understanding of networking concepts, you can transform a low-cost Raspberry Pi into a powerful tool for network monitoring, providing real-time insights into your network's performance, security, and overall health.
While the benefits of network monitoring with a Raspberry Pi are significant, there are a few limitations to consider. One important point to note is that the Wi-Fi traffic going to the router will not be monitored, especially if the Pi is connected to the network via Wi-Fi. However, the Raspberry Pi can monitor all other connected devices.
In this tutorial, we saw how to monitor network traffic on a raspberry pi system. As seen here, there are many tools suited for the job, and all of them can be installed via the default package manager on the raspberry pi.
In conclusion, setting up a network monitoring system using a Raspberry Pi is a valuable investment for anyone who wants to maintain a healthy and secure network. By proactively monitoring your network, you can identify potential problems, prevent security breaches, and optimize performance. The Raspberry Pi offers a cost-effective, flexible, and customizable solution that makes network monitoring accessible to all. With a little time and effort, you can transform a simple device into a powerful tool that provides real-time insights into your network's behavior, helping you to ensure its smooth operation and protect its valuable assets.
- Iot Device Commands Over Internet Solutions Insights
- Lana Rhoades From Adult Films To Motherhood Latest News Updates